
A Beginner's Guide to Managing an Azure Environment
A practical framework for establishing a well-governed, secure, and cost efficient Azure environment through standards for resource hierarchy, naming, tagging, and automation.

Read time: 14 minutes
1. Introduction
As a consultant, I’m often brought in as a reactive measure when costs spike or a data breach has already occurred. Many of the issues I’m called to fix could have been proactively avoided with upfront planning and by involving the right expertise at the start of a project. If you’re struggling with unclear ownership, security concerns, and ballooning costs, you’re likely seeing the early warning signs of a cloud environment that is slowly drifting out of control.
Without a deliberate plan, cloud adoption often descends into a pile of spaghetti - a disorganized pile of resources with unclear ownership, inconsistent security, and unpredictable costs. The initial speed and agility of the cloud gives teams the ability to rapidly accumulate technical debt, which more often than not results in innovation slowing down instead of accelerating.
In this article, we’ll introduce the core concepts of managing an Azure cloud environment. Understanding these will allow you to transform your Azure environment by setting clear standards for organizing, naming, securing and automating your resources. This article will give a robust introduction to building an organized Azure environment enabling teams to innovate quickly and with confidence.
2. Structuring your Environment
Before creating standalone resources (like a storage account or virtual machine) you need to understand how different resources are configured and fit together. Azure provides a powerful three-tiered structure for organizing your environment: Management Groups, Subscriptions, and Resource Groups. Figure 1 shows how Management Groups sit above Subscriptions, which sit above Resource Groups.

2.1 Management Groups
At the top of the hierarchy are Management Groups. Think of these as the headquarters of your Azure estate. Management Groups allow you to organize subscriptions into a hierarchy for scalable governance. These are used by centralized platform teams to ensure consistency by setting universal, non-negotiable rules that apply to everything that sits under them.
By applying policies and access controls at this level, they get inherited by subscriptions. Examples include:
Security example: No storage account can be created without a private endpoint. This single rule is automatically inherited by all subscriptions, ensuring a consistent security baseline everywhere by disabling public access.
Cost Management example: Require every resource that is created to have a
CostCentertag. This ensures spending can be tracked across all business units without exception. Resources that are created without this tag will return an error.
By grouping subscriptions under a single management group, you don’t need to configure settings individually for each subscription. This makes managing multiple subscriptions much more efficient.
2.2 Subscriptions
Subscriptions are the next level down and the primary boundary for billing, policy, and access management. If management groups are the headquarters, subscriptions are the major divisions or business units of your company. Subscriptions provide a powerful way to isolate resources and responsibilities with slightly more granularity.
When it comes to subscriptions, there are a handful of different patterns that people use. There isn’t a one size fits all pattern to follow and it depends on things like the size of your organization, the types of workloads and governance needs. Two common patterns are:
Per Environment. This provides strong isolation making it easier to apply different policies but leads to more subscriptions to manage. For example:
Production:
sub-prodDevelopment:
sub-devQuality Assurance:
sub-qa
Per Application. This gives you easy lifecycle management but can lead to subscription sprawl if every small app gets its own subscription. For example:
Payroll:
sub-payrollappSales Portal:
sub-salesportalData Analytics:
sub-dataanalytics
There are pros and cons to each approach. The per environment pattern creates hard boundaries that prevent, for example, a developer from accidentally deleting a production resource. Whereas the per application pattern gives you clear cost ownership and makes it much easier to turn off all resources associated with a specific application or workload.
2.3 Resource Groups
Within each subscription are Resource Groups. These are logical containers that hold all related resources together. Think of them as individual project teams within a business unit. Resource groups help to simplify organization inside a subscription. Resources that share the same lifecycle, meaning they are created, managed, and deleted together, should be in the same resource group.
Image analysis example: A Resource Group named
rg-dataplatform-prod-ingestion-001might contain:An AI Vision Service to generate image metadata
A Storage Account to store image files and metadata
A Key Vault to manage credentials
Together, these resources enable a single computer vision workflow. When the project is retired, deleting the Resource Group removes everything at once, ensuring no orphaned resources or unnecessary costs. Note that deleting a Resource Group is permanent and can’t be undone.
A minor nuance to mention here is that a Resource Group can contain resources in different Azure regions, but certain services require all related components to be in the same region. This is service dependent and requires some upfront research during the project planning phase.
It’s important to think about how your Azure environment will be structured before deploying resources. There isn’t a right or wrong answer but choosing a pattern that fits your requirements will save a lot of pain down the road.
I’ve seen many organization burnt by skipping an initial planning phase.
3. Naming Conventions
Once you’ve decided on your environment structure, it’s time to think about a consistent naming convention that you will apply to all resources. When enforced, this helps to create clarity, predictability, and operational efficiency.
This might seem trivial, but a well-defined (and enforced) naming standard is one of the most effective tools you have. It makes resources instantly identifiable, simplifies automation, and results in a professional, ordered environment which can be more easily upgraded and audited. Without this, you end up with a confusing mix of names like test-storageaccount-final, robs-vm, data-prod, making it nearly impossible to understand your environment in a single glance.
The goal is to create a naming convention that is consistent, automation friendly, and both human and machine readable.
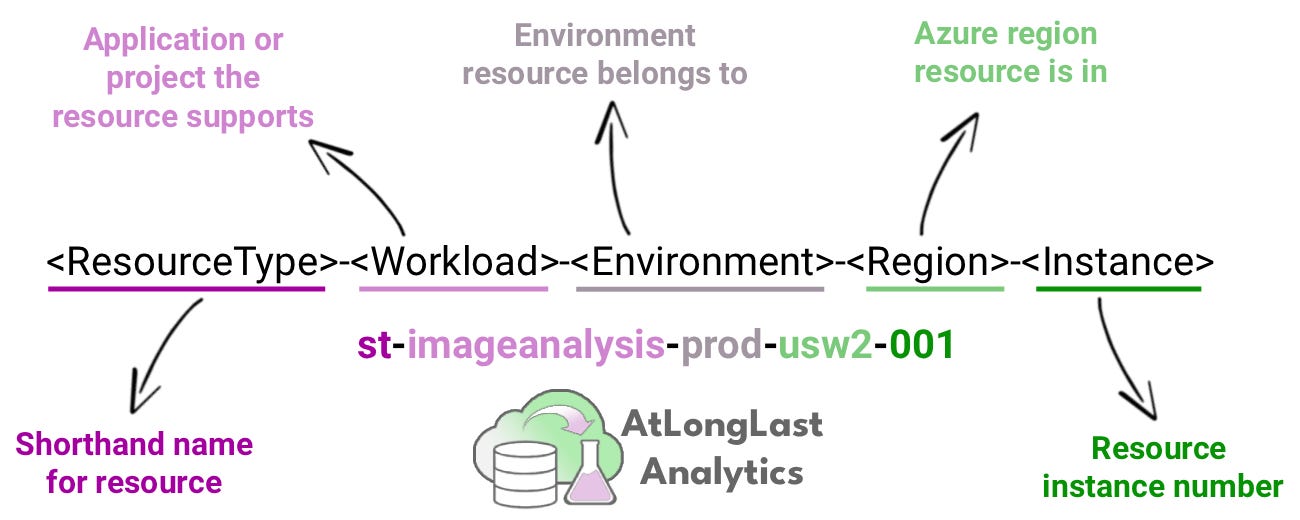
A robust and widely used pattern recommended by Microsoft is:
<ResourceType>-<Workload>-<Environment>-<Region>-<Instance>
Let’s break this down with a practical example like st-imagetagging-prod-usw2-001:
st - Resource Type: Abbreviation for Storage Account.
imagetagging - Workload or Application Name: Indicates this Storage Account belongs to the image tagging service in the data platform.
prod - Environment: Immediately tells you this is a production resource and should be handled with caution.
usw2 - Azure Region: Indicates ‘US West 2’, useful for multi-region architectures.
001- Instance Number: Supports multiple uniquely named resources of the same type for the same workload.
This is shown visually in Figure 2. I recommend the Azure Periodic Table as a good resource for quickly looking up the abbreviated names for different resources.
My advice is to adopt these three good practices:
Maintain a standardized list of abbreviations for resource types, environments and regions.
Use the Microsoft Cloud Adoption Framework as a starting point for naming rules and abbreviations.
Apply Azure Policy to enforce naming rules at the subscription or management group level.
Note that you can’t be overly rigid with your naming rules as different Azure resources have different rules for character limits, allowed characters, and case sensitivity. Also, some resources require globally unique names.
The Cloud Adoption Framework recommended format can and should be adapted to your organization’s needs.
Remember, consistency is more important than the exact pattern you choose.
4. Tagging Policy
A good naming convention tells you what a resource is but tags tell you why it exists.
Tags are key-value pairs of metadata that you attach to Azure resources, resource groups, or subscriptions. They provide essential business context that names alone can’t capture. Consistent tagging transforms a simple list of technical assets into a rich, queryable inventory that can support cost allocation by department or project, automation of operational tasks, and clear ownership for faster incident response.
Just like naming conventions, the power of tagging comes from consistency. Manual tagging is error-prone, so it’s best to automate tags with Azure Policy.
Example policy:
Prevent creation of any new resource unless it includes both
OwnerandCostCentertags.Automatically add missing tags to existing resources based on subscription or resource group metadata.
I’ve experimented with many different tags over the years and found six core tags that are useful for almost every organization. These are:
Owner: Email alias of the person/team responsible. When a security alert fires or a resource needs to be decommissioned, you know exactly who to contact. Critical for incidence response and lifecycle tasks.
CostCenter: Business unit or department for billing. This is essential for financial accountability in the cloud.
Environment: Classifies resource by stage, e.g. prod, dev, qa. This allows you to separate production and non-production costs and apply different rules to each.
ProjectName: Links resource to a specific project or initiative. This let’s you track cost at a more granular level.
DataClassification: Security/compliance sensitivity level, e.g. public, internal, confidential. Important for access management, governance, and compliance.
Automation-Shutdown: Boolean flag for non-critical workloads that can be stopped outside of business hours. True or False. You can create automated scripts that run every evening and shut down any non-production resource with the tag Automation-Shutdown: True, significantly reducing monthly costs.
Tags can be applied to most - but not all - Azure resources. Classic resources don’t support tags directly so you need to account for this in your tagging strategy. Each resource can have up to 50 tags but I’ve yet to see any reason to use this many…
Tags can and should be automated wherever possible. Azure Policy can append tags or deny resource creation without required tags, but beware that only user-assigned tags persists if a resource is moved between subscriptions.
5. Identity and Network Control (Securing your Platform)
Now we understand how to structure our environment and attach metadata to our resources, we need to understand how to securer our resources. We are going to focus on two fundamental pillars:
Controlling who can access resources (Identity)
Controlling how those resources communicate (Network)
The guiding philosophy for both is the principle of least privilege, grant only the minimum permissions necessary to perform a task.
5.1 Identity and Access Management
At the core of Azure security is managing who can do what. This means replacing generic administrative accounts with a fine-grained, role-based permission model that is secure, scalable and easy to manage. In this section we are going to introduce the core components to implement an access management solution.
Microsoft Entra ID and Security Groups
Entra ID (formerly Azure Active Directory) is the identity foundation for Azure. The standard practice in Entra ID is to create personas and assign permissions to these personas, do not assign permissions directly to individual user accounts. This is a three step process:
Create security groups in Entra ID (e.g. create a role for the data engineer persona)
Assign Azure roles to the groups (e.g. give the data engineer persona the ability to read the data within a storage account)
Add user to those groups (add individual users to the data engineer persona)
Following this approach allows us to efficiently control user permissions by making one change and having it propagate to multiple users. This makes onboarding/offboarding simple, you update group membership and permissions are adjusted everywhere automatically.
To successfully implement Entra ID Security Groups, you need to have an idea of the different personas that you have within your organization before you get started. Once you understand the different personas, you then need to think about the permissions they need over the different resources to do their job.
This approach assumes the group-based resource access model. If you integrate with on-premises AD, make sure Azure group membership properties sync properly.
Role-Based Access Control (RBAC)
We use Azure RBAC to grant the exact permissions to security groups. The key is to be specific and avoid broad roles like Owner or Contributor at a subscription or resource group level. Instead, use built-in roles at the resource level that match the exact level of access you need.
For example, if an application only needs to read and write data to a single blob container, assign the Storage Blob Data Contributor role at the container level, not the Contributor role at the storage account level. We are again following the least privilege model and assign the minimal permissions needed at every stage.
Managed Identities
Managed Identities let us do something very similar to Security Groups but for Azure resources instead of users or groups. Managed Identities let resources authenticate against each other without needing stored credentials.
In practice, an Azure resource (like a Virtual Machine or App Service) gets an identity in Entra ID, which can then be used to securely request tokens to access Azure services. This eliminates the single most common security vulnerability, storing passwords, connection strings, or API keys in code or configuration files.
The vast majority of Azure services support Managed Identities but not all, it’s worth checking the compatibility before architecting.
5.2 Securing the Network Perimeter
If you’re working with non-sensitive data or applications that are not commercially sensitive then you might not have to worry two much about network security. I have seen many organization expose a questionable amount of information and it’s rarely an intentional choice, it typically stems from not understanding secure by design principles.
A secure environment is private by default. Your goal is to minimize your public attack surface by building a secure network boundary around your resources which controls all inbound and outbound traffic.
Virtual Networks (VNets)
Your primary isolation tool is the Azure Virtual Network (VNet) which gives you a private, logically isolated slice of Azure’s network. Deploying resources (like Virtual Machines and Databases) inside a VNet let’s you control all traffic with Network Security Groups (NSGs). NSGs act like a basic firewall at the sub virtual network level.
Note that VNets are logically isolated, not physically air-gapped!
Private Endpoints
By default, many Platform-as-a-Service (PaaS) services like (Storage, SQL, Key Vault) are publicly accessible. Private Endpoints change this by mapping the service onto your VNet with a private IP address. Your resources then connect over the private network, allowing you to disable its public endpoint, effectively removing it from the public internet. Understanding networking basics will set you apart from your peers.
Private Endpoints require proper DNS setup to resolve service names and so disabling public endpoints can break services like Azure Monitor unless private connectivity is correctly configured. If you’re a data engineer, you might want to consider specializing in cloud engineering so you can build robust data platforms in Azure.
Azure Key Vault for Secret Management
Even inside a private network, applications need credentials like database passwords or API keys to access resources. Azure Key Vault is the centralized, hardware-backed, secure store for secrets, keys, and certificates.
Key Vault is a centralized repository for sensitive information, enhancing security by keeping secrets out of application code and configuration files.
Key Vault gives you an easy way to rotate secrets without modifying your application code. This is a great solution to minimize impact of any potentially leaked credentials.
Key vault access can be controlled with traditional Azure Policies or Azure RBAC but Microsoft recommend using RBAC for consistency with broader identity management.
5.3 Putting It All Together: The Secure Passwordless Pattern
This pattern combines Managed Identities, RBAC, and Key Vault for maximum security and a zero credential architecture:
Assign Identity: Enable a system-assigned or user-assigned Managed Identity on your compute resource (e.g., an Azure Function or an App Service).
Grant Permissions: In Key Vault's Access Policies, grant that identity
GetandListpermissions to the secrets it needs (via RBAC).Fetch at Runtime: Using the Azure software development kit (SDK), the resource authenticates with Entra ID via its Managed Identity. The SDK retrieves an OAuth token and securely fetches secrets from Key Vault at runtime. All without any stored credentials.
The result is a truly passwordless architecture. No credentials are ever stored in code, configuration files, or environment variables. There are no secrets to be leaked or rotated, dramatically improving your security posture by aligning with Microsoft’s Zero Trust and passwordless-first strategies.
6. Infrastructure as Code (Automation and Consistency)
Everything discussed so far; structuring, naming, tagging, and securing can be configured manually in the Azure portal. This point and click method, often called "ClickOps", is fine for initial exploration or proof-of-concepts. But at scale, it becomes a liability.
People make mistakes, steps get skipped, and the lack of repeatability leads to inconsistencies. Before you know it, your carefully planned environment experiences configuration drift, where production no longer matches development or your documented architecture.
The solution is to treat your infrastructure the same way you treat application code, we call this Infrastructure as Code (IaC). IaC uses human-readable definition files to declare your cloud resources. These definitions are stored in version control (e.g. Git) and deployed via automated pipelines.
IaC transforms governance from the theoretical what we intend into an executable blueprint of what actually gets built. This offers three major advantages:
Repeatability: Need a temporary testing environment? With IaC, you can deploy an exact replica in minutes, including networking, security and policy settings.
Version Control: The entire Azure environment definition lives in your Git repository. You have:
A full change history: who, when, why.
Clear diffs to review changes before they go live.
The ability to roll back to a prior state if something breaks.
Automated Validation: When integrated with CI/CD, IaC let’s you automatically enforce your standards for naming, tagging, and policy requirements before any resource is provisioned. This makes compliance the default, not an afterthought.
Two are two primary IaC languages for Azure deployments:
Terraform: The cloud-agnostic industry standard (works with Azure, AWS and GCP). If your organization operates in a multi-cloud environment, Terraform is the most powerful and flexible choice.
Bicep: Microsoft's own native Domain-Specific Language (DSL). Bicep is simpler than its predecessor (ARM Templates) and is the recommended choice for teams that are fully committed to the Azure ecosystem due to its tight integration and "day-zero" support for new Azure services.
7. Conclusion
Building a cloud capability in Azure isn't just about adopting new services. It's about building a solid, well-governed foundation that enables scalability.
The core concepts introduced in this article; structuring your environment, enforcing naming and tagging conventions, securing your platform with robust identity and network controls, and adopting Infrastructure as Code, are not merely a list of best practices. They are the foundational building blocks of a resilient cloud strategy.
By shifting from a reactive "fix-it" mindset to a proactive, governance-first approach, you transform your Azure environment from a high-risk investment into a strategic asset. An organized, secure, and automated cloud platform accelerates your teams delivery and allows you to innovate with confidence to deliver business value.
Cloud services, pricing models, and compliance requirements change frequently, so your operational model must evolve with them. You need to enforce an iterative cycle of implementation, monitoring, and refinement.
Here’s how to start building momentum:
Start Small and Focus on Impact
Begin by implementing policies that immediately improve operations.
Enforcing the
OwnerandCostCentertags with Azure Policy is a great first step. This delivers instant clarity for responsibility and billing.Avoid the temptation to implement dozens of policies at once, this can (and typically does) stall wider adoption.
Automate Everything
Use Infrastructure as Code and Azure Policy to enforce your standards automatically.
Integrate checks into CI/CD pipelines so that non-compliant resources never make it to production.
Continuously Review and Improve
Use Microsoft Defender for Cloud for security recommendations and compliance checks.
Review Azure Cost Management and Billing dashboards regularly to identify where volatile costs may come from.
Periodically audit unused or underutilized resources and decommission them to control costs.
Stay updated on Azure service changes to refine your policies before new risks to your operations emerge.
If you’re using Azure in your data operations. A well-managed environment reduces security risks and controls costs, freeing up your teams to deliver value and innovating with confidence on a stable, secure, and cost-efficient platform.
If you’re unhappy with how your Azure environment is running, reach out to us here to see how we can help. Two of our core services include Azure environment audits and building data and AI solutions.
      Thanks for reading! Feel free to follow us on LinkedIn here and here. See you next time!

          To receive new posts and support our work, become a free or paid subscriber today.
If you enjoyed this newsletter, comment below and share this post with your thoughts.