
Migrating Files from Sharepoint to Azure : Basic Implementation [1/3]
Data migrations are a common data engineering task and this step-by-step guide shows you how to use Logic Apps to successfully migrate files from SharePoint to Azure.

Read time: 11 minutes
SharePoint is a great tool for collaboration but it often becomes a data silo as an organization’s data goals evolve and they want to get more value from their data. When this happens, data engineers are often tasked with migrating files from SharePoint to a data storage solution like Azure Blob storage. As data engineers we need to be confidently build automated, scalable solutions to achieve this.
A common solution for this type of task is Azure Logic Apps but many of the guides on the topic are outdated. I tried to use multiple LLMs to build this but they all needed multiple rounds of prompting to even get a solution that worked (even then it wasn’t great). They would repeatedly suggest outdated components which no longer exist.
This is what motivated me to write this post!
We are writing three step-by-step guides describing how to migrate files from SharePoint document libraries to Azure Blob Storage using Logic Apps. The three posts will cover:
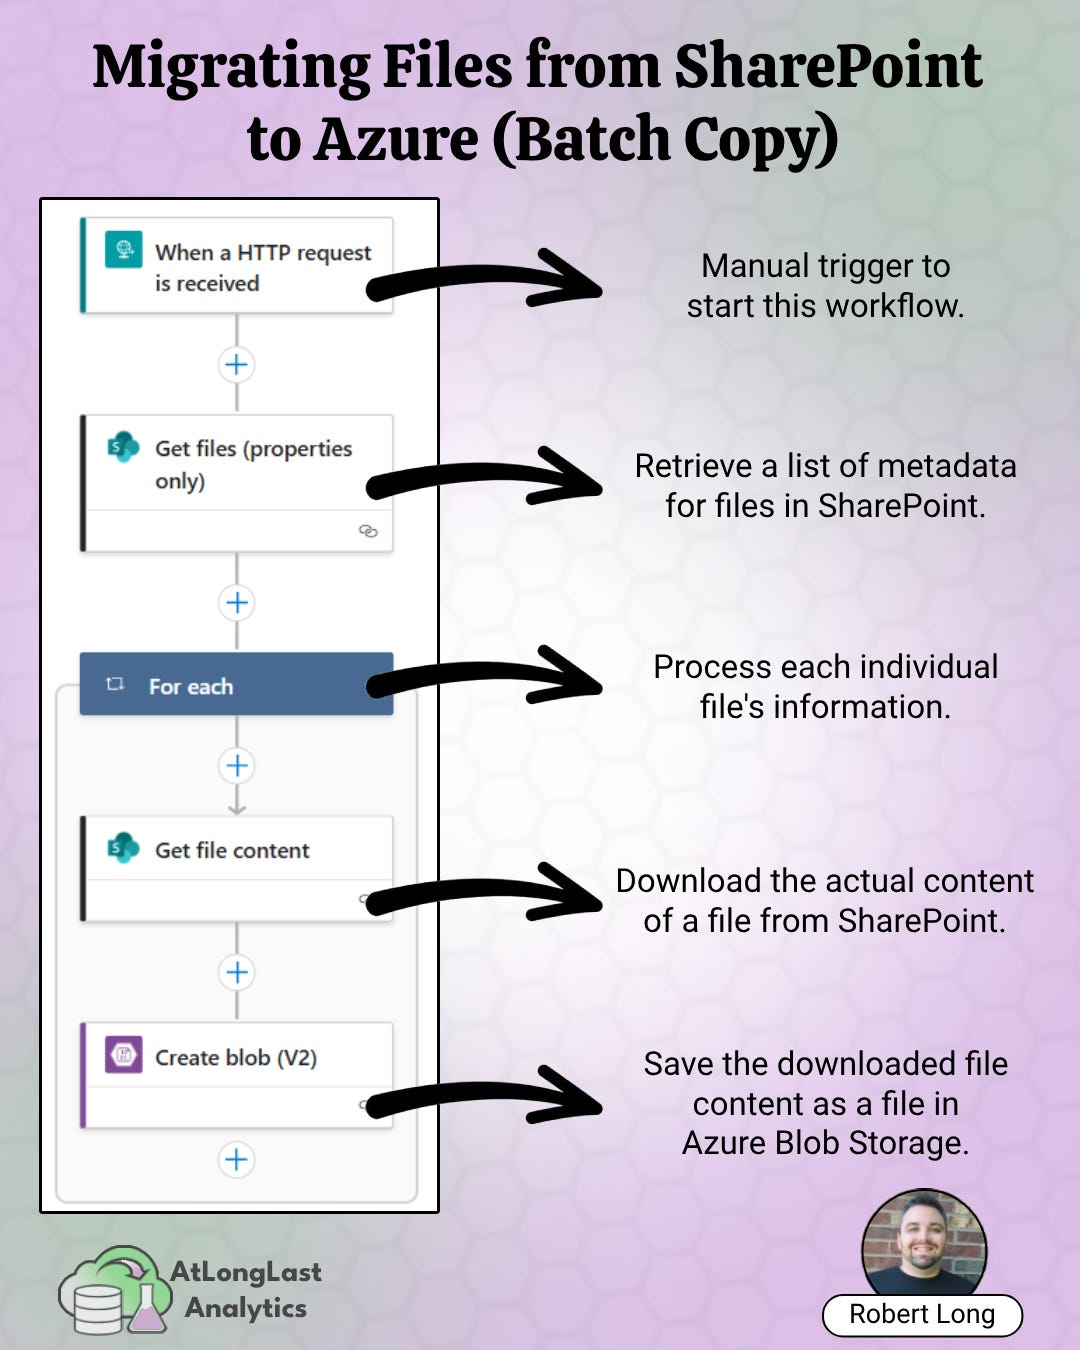
This post shows you how to batch copy a single document library.
The next post will show you how to batch copy a specific list of document libraries and filter for specific file types and file names.
The final post will show you how to perform an incremental load. We’ll build a Logic App that runs daily and only copies files that have been modified in the previous 24 hours.
1. Introduction
Many organizations use SharePoint (and it’s libraries) as a collaborative tool that integrates with the Microsoft 365 ecosystem. As an organization becomes more data mature, their needs evolve and convenient document stores like SharePoint document libraries become silos. An organization’s critical documents become inaccessible to data pipelines and machine learning models, and as the data volumes grow, you may need to archive data in a more cost-effective way.
SharePoint is an excellent collaboration tool, but it's not designed to be a large-scale data lake.
In contrast to SharePoint, a data lake technology like Azure Blob Storage gives you enhanced data governance and accessibility.
You get increased data governance by defining automated lifecycle policies, point-in-time backups and regional replication. You can make your data more secure by implementing robust encryption, access controls and networking rules (e.g. by using virtual networks and private endpoints). Blob Storage gives your data more accessibility by providing REST APIs and SDKs (software development kits) that make it easier to embed upload/download logic directly into applications and data pipelines.
A common data engineering challenge is then to bridge the gap, by detecting files (even those buried in nested folders) and copying them to Azure Blob Storage without manual intervention.
In this post, we will discuss Logic Apps, why they’re a good fit, and then build a simple Logic App to copy files from a single document library to Azure Blob Storage.
What are Logic Apps?
Azure Logic Apps are a no-code/low-code way to build automations and integrate different systems. Instead of writing code, Logic Apps let you create workflows visually by connecting a trigger (an event that starts a workflow) and actions (operations that run in sequence) on a drag-and-drop style canvas. This makes Logic Apps a powerful tool for building solutions that require real-time feedback and iteration, and those that require an “if this, then that” flow.
Logic Apps come with hundreds of built-in connectors for services like SharePoint, Azure Blob Storage, SQL Database, HTTP, and many more. This versatility let’s you quickly link systems within the Azure ecosystem with external platforms and makes them well suited for connecting disparate systems without needing deep programming expertise.
Why Use Logic Apps?
There are huge benefits to using a tool like Logic Apps over heavier ingestion tools like Azure Data Factory when migrating documents from SharePoint to Azure Blob Storage. Obviously priorities differ depending where you work but if you’re data engineering team is small or pipelines need to be understood by a diverse audience, then Logic Apps have the following benefits:
Low-code development: This reduces the amount of custom code data engineers need to write and maintain leading to quicker build-test-iteration cycles. As a project manager, you get the benefits of faster development cycles and easier understanding of pipelines involved in the data migration process.
Built in Connectors: Logic Apps have a large, diverse set of connectors for both SharePoint and Azure Blob Storage. This eliminates the need to handle complex authentication mechanisms or developing custom API calls.
Cost-Effective: Logic Apps can operate on a subscription or consumption based model. For many common scenarios, we aren’t moving terabytes of data every hour and so the pay-as-you-go option is very cost-effective. Note that you should monitor your costs and if you consistently spend more than a managed instance, you should switch from pay-as-you-go.
Monitoring and Logging: Logic Apps provide built-in monitoring which let’s you track the progress of your migrations, identify issues, and ensure data integrity. They can also be connected to Log Analytics for a centralized logging solution.
So now we understand the problem and we’ve chosen a suitable tool, let’s get started!
2. Implementation
Here, we are going to build a Logic App step-by-step and explain the thought process in building this solution. You do need the prerequisites before getting started, if you don’t have them, pause here and go set them up!
Prerequisites
Before starting on the Logic App you need to have the following:
A SharePoint site with a document library (that has some documents in it). You need to have admin permissions over this SharePoint site.
An Azure Storage Account (ADLS Gen 2) with a container. When you create this storage account make sure the Enable hierarchical namespace option is checked
It’s not explicitly needed but I suggest having a Log Analytics Workspace in the same resource group as your Logic App so you can have a standard way of storing logs and monitoring runs.
Creating the Logic App
Create a Logic App
We will create a new Logic App and use the Consumption hosting plan. With this plan we’re charged for each workflow execution, trigger, and connector used but this should be very cheap for demonstration purposes. (For new users the consumption plan comes with a set number of free actions - this used to be 4000 but it’s less clear what the number is now)
If you made a Log Analytics Workspace when setting up the prerequisites, make sure you connect your Logic App when you create it.
Add a Manual Trigger
Navigate to the Logic App and click edit. The designer view should show a blank canvas with a prompt to Add a trigger.
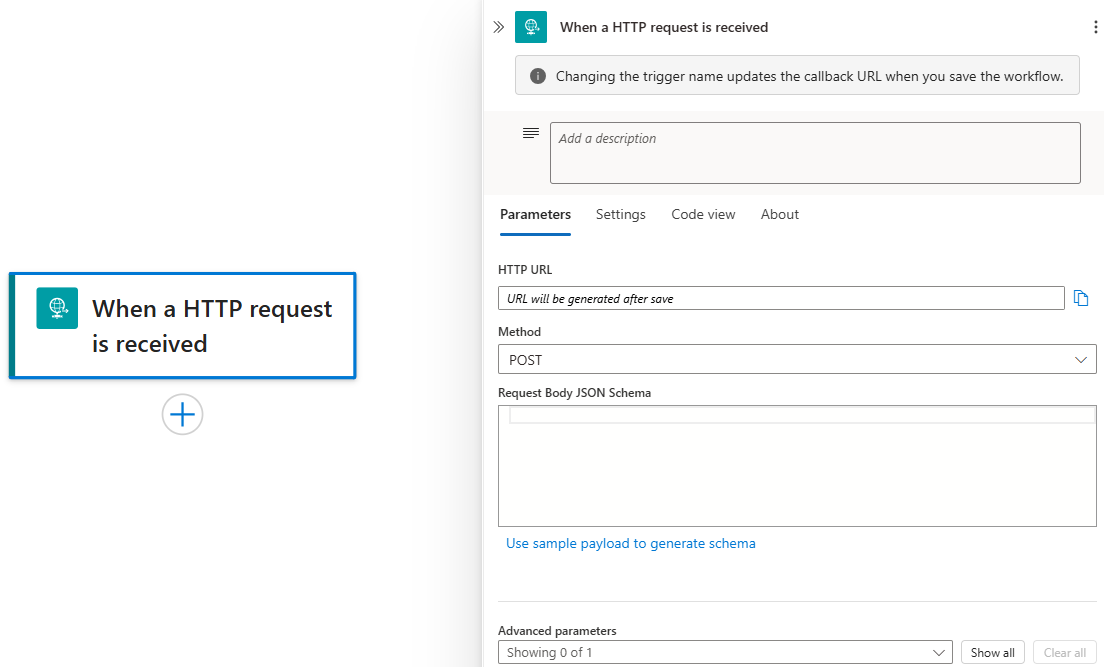
We don’t need this Logic App to run on a schedule or be event-driven, we only want it to start when we manually trigger it so we will add the When a HTTP request is received trigger (found by searching for ‘request’). Show in Figure 1.
All we need to do is set Method to POST. The HTTP URL will be defined by the Logic App when you save it. A web message can be sent to this URL to trigger the workflow.
Get a List of Files and their Metadata from SharePoint
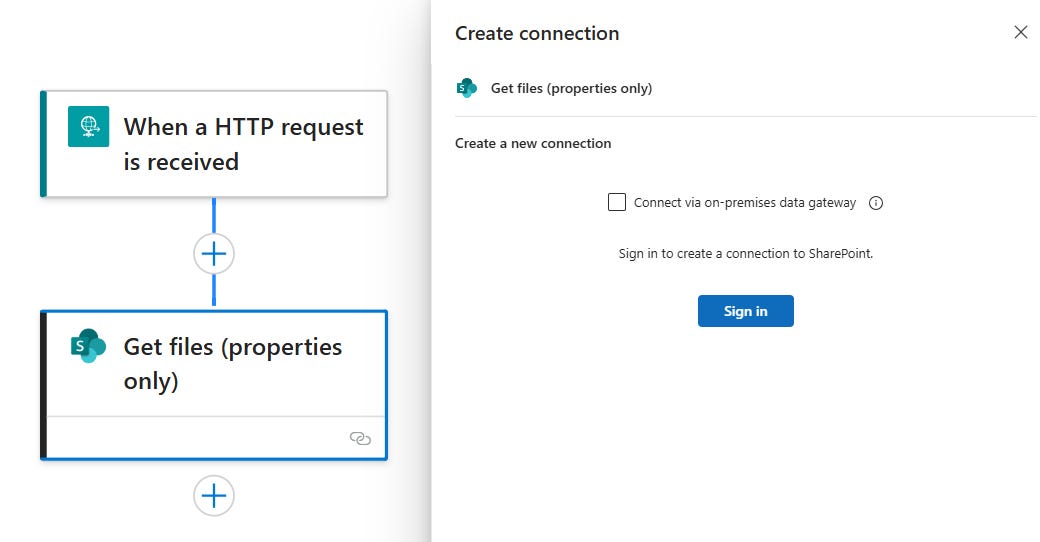
Add the Get Files (properties only) action from the SharePoint connector (found by searching for ‘sharepoint’). When you add this action it will prompt you to login to your SharePoint account (this should look like Figure 2). The account you login to must have admin permissions over the SharePoint site that you want to copy files from.
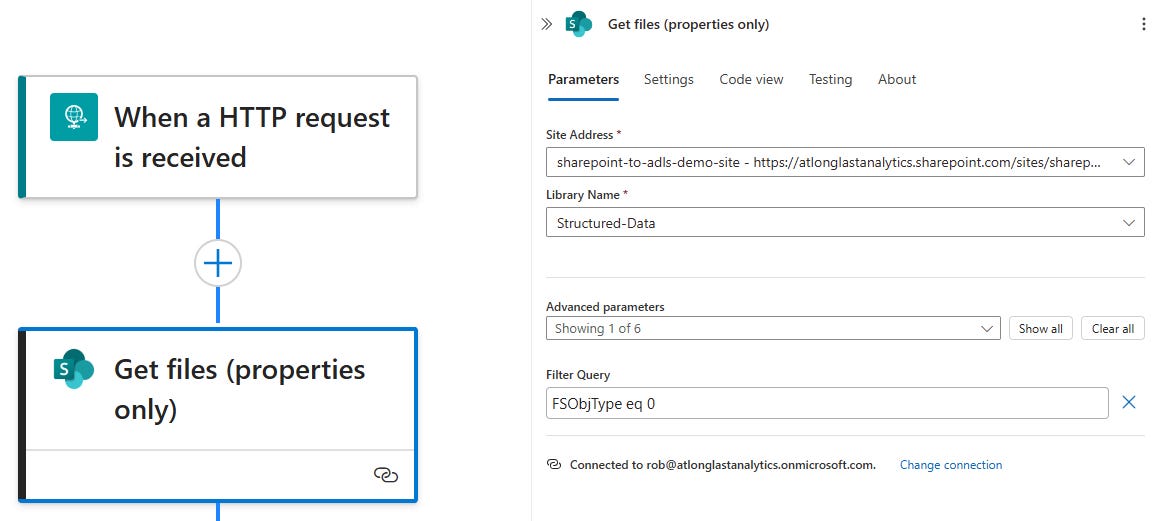
Once you sign in to your account you can select the SharePoint site that you want to connect to from the Site Address dropdown menu. Once selected, the Library Name dropdown menu will list all document libraries that you have access to within that SharePoint Site - select the one you want to copy files from.It’s important for a later step that we add a filter to only retrieve files and not folders. Within the Advanced Parameters menu select Filter Query and set it to FSObjType eq 0 (see Figure 3). We are able to do this and keep hierarchical folder structure because one of the key properties for each file is the full path, which includes the folder structure within SharePoint.
A quick breakdown of this filter:
FSObjType: this is an internal SharePoint property that indicates type of object
eq: OData comparison operator meaning “equals to”
0: In SharePoint, 0 represents a file (and 1 represents a folder)
Download the Content of Each File Listed in the Previous Step
Add the Get file content action from the SharePoint connector (search for ‘sharepoint’) below the Get files (properties only) action. When you add this action, you should again select the SharePoint site that you want to copy files from under the Site Address dropdown menu.
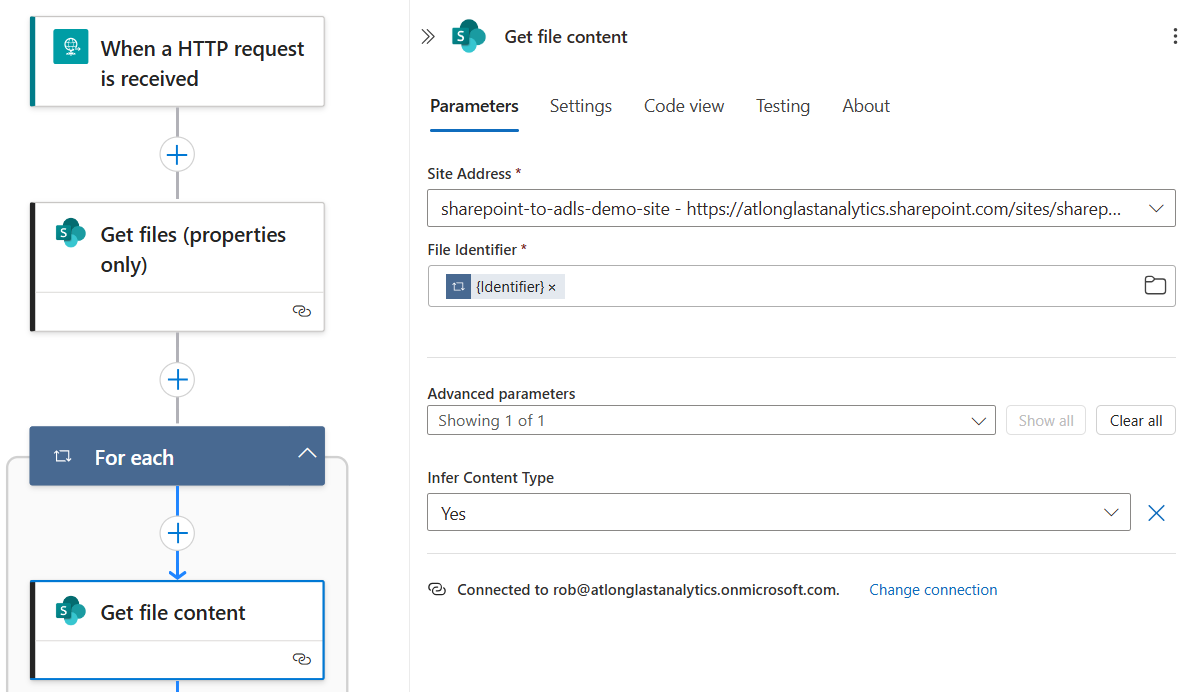
When you select the File Identifier field, do not type directly into it and instead choose Enter the data from previous step by selecting the lightning bolt icon. Search for ‘identifier’ and select Identifier from the Get files (properties only) output. This should then wrap this action in a For each loop, shown in Figure 4.
The Identifier is a unique, stable, internal ID that SharePoint assigns to every item. We opt to use this over file paths because it’s stable to files being renamed or moved (which helps with idempotency) and contains no special characters (if you use the file path and it does contain special characters this can give errors if they’re not parsed correctly).
You can confirm the For each is configured correctly by clicking on it and making sure that the Select An Output From Previous Steps is set to the value from Get files (properties only). This value includes the list of files from SharePoint and gives us the items we need to iterate over.
Figure 4: Iterate through the list of files output from Get files (properties only) and get the file content for each. Now we are starting to leverage the power of Logic Apps, without writing any code we can use the dynamic expression to pull results from the actions to build our pipeline.
Save the Downloaded File Content to a File in Blob Storage
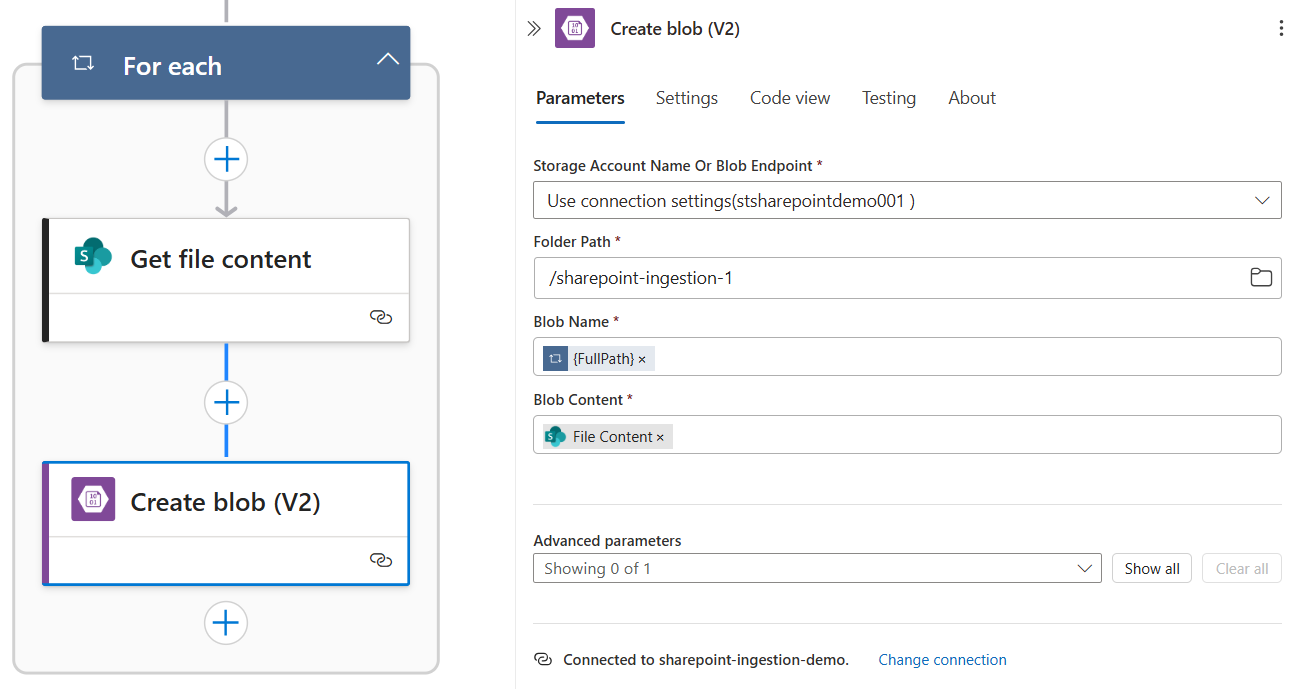
Add the Create blob (V2) action from the Azure Blob Storage connector after the Get file content action - make sure this is also within the For each loop. When you add this action you need to create a new connection to your Azure Storage Account. You can use any of the authentication types from the dropdown menu but the most straight forward is Access key. To find this information, navigate to your Storage Account and copy the name and Access key (which is found within Security + Networking tab) to create the connection.
Once the connection is established, you should see the Storage Account in the Storage Account Name Or Blob Endpoint dropdown menu, and once selected, the Folder Path dropdown menu should contain a list of containers in said storage account. Choose the one you want to write the data to.
For the Blob Name, click the lightning bolt icon and search for ‘path’, you want to set this to the Full Path output from the Get files (properties only) action. We use the Full Path as this helps us to preserve the original structure; remember that Blob storage is flat meaning there are no true ‘folders’, however, slashes in blob names are interpreted as hierarchical delimiters and displays blobs in a folder-like structure.
For the Blob Content, click the lightning bolt icon and select File Content from the Get file content action. The reason that we filtered out folders in step 2 was to prevent errors here. If we were to try and write the file content for a folder, an error is raised because a folder doesn’t have content in the same way that files do.
Figure 5: A connection is made to a storage account and blobs are saved with names derived from their full file path in SharePoint.
Verifying the Logic App Works
Now the Logic App is completed, we can save it and then run it. When it starts running you should be prompted to open run and doing this visually show you the workflow progress and state of each action. Note that you may have to refresh this to see the For each block checkmark. A successful run looks like:

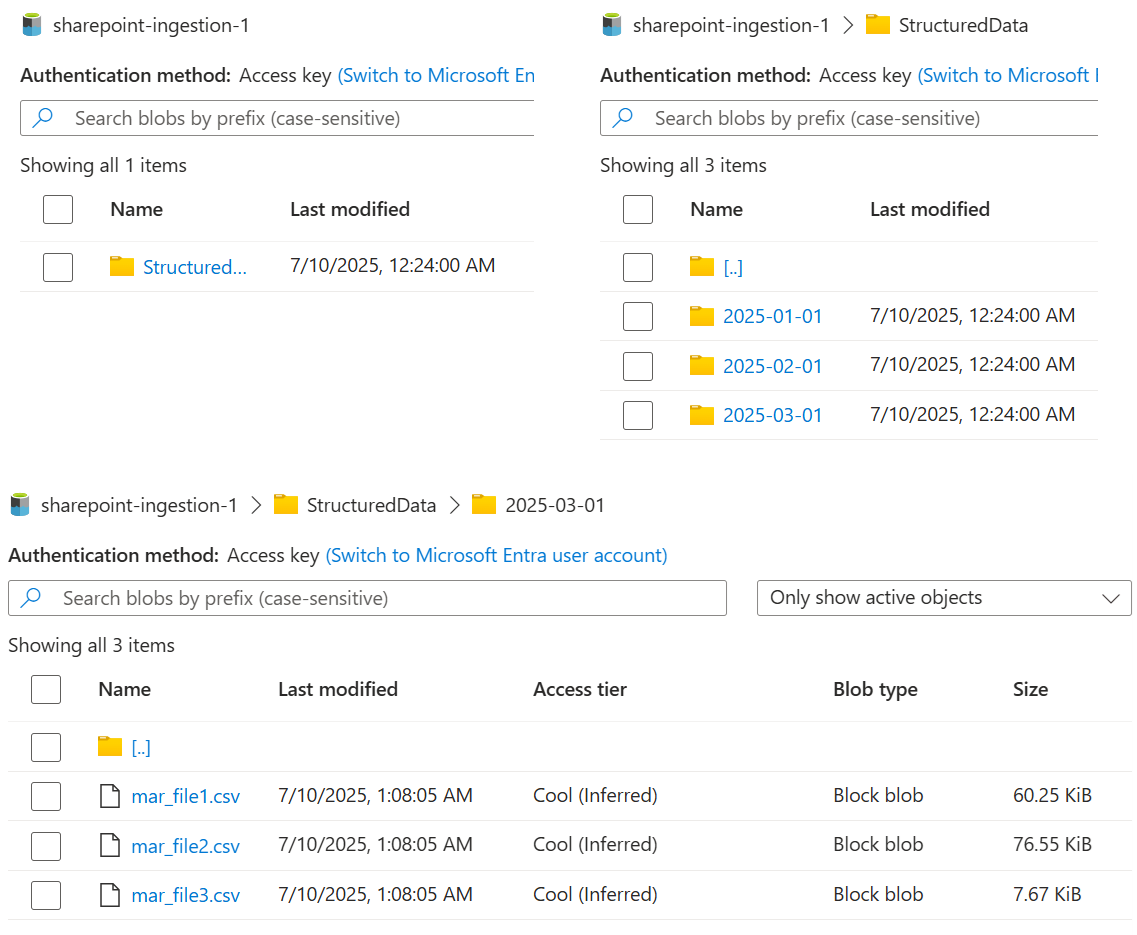
The final check is to verify that the files now exist in Blob Storage. Navigate to your storage account and inspect the blob container you wrote to - you should see all of your folders and files here! For me, I was copying the document library Structured Data, which contains three folders, and each folder contains some CSV files. The storage account now has copies of each file in my document library and it has kept the hierarchical file structure! Check this out in Figure 7.
At this stage watch out for false positives! If an error happens between creating the blob and writing it’s content then you may see blobs but they would have a size of 0.00 B. In figure 7 we see that all files have a sensible size.
That’s it, we’ve done it! We have confirmed the needed infrastructure, created a Logic App to copy files from SharePoint to Azure Blob Storage, and verified a successful migration.
3. Summary
In this post we have created a Logic App to batch copy files from a SharePoint document library to Azure Blob Storage whilst keeping the original folder structure. This step-by-step guide gives data engineers a basic template that they can use to perform their own SharePoint migrations to support their organization’s evolving data requirements.
This was an introduction to Logic Apps and in the next two posts we will improve on this implementation by copying a custom list of document libraries and filtering specific files, and then building a Logic App that performs an incremental load instead of a batch migration. Be sure to subscribe so you don’t miss those guides!
A key motivation for putting this together was my personal frustration with outdated tutorials which were only published a few years ago. I experienced similar issues when trying to use LLMs to build this as they would also suggest outdated components and only after multiple prompts was I able to get a working solution (although that was also suboptimal).
This guide works as of July 2025! We will update this in the future if the implementation needs to change.
      Thanks for reading! Feel free to follow us on LinkedIn here and here. See you next time!

          To receive new posts and support our work, become a free or paid subscriber today.
If you enjoyed this newsletter, comment below and share this post with your thoughts.
If you're struggling to integrate data from Sharepoint with your Azure environment and need support, book a free call with me to see how I can help: https://calendly.com/atlonglastanalytics