
Migrating Files from SharePoint to Azure : Incremental Load [3/3]
Successful data migrations require both full and incremental loads. Here we build a low-code Logic App solution to migrate files from SharePoint to Azure using an incremental load.

Read time: 8 minutes
SharePoint is a great tool for collaboration but it often becomes a data silo as an organization’s data goals evolve and they want to get more value from their data. When this happens, data engineers are often tasked with migrating files from SharePoint to a data storage solution like Azure Blob storage. As data engineers we need to be confidently build automated, scalable solutions to achieve this.
A common solution for this type of task is Azure Logic Apps but many of the guides on the topic are outdated. I tried to use multiple LLMs to build this but they all needed multiple rounds of prompting to get a solution that worked (even then it wasn’t great). They would repeatedly suggest outdated components which no longer exist.
This is what motivated me to write this post!
This is the third and final post in this series of step-by-step guides which describe how to migrate files from SharePoint document libraries to Azure Blob Storage using Logic Apps. The three posts will cover:
This post shows you how to perform a full load, copying a single document library.
This post shows you how to perform a full load, copying a specific list of document libraries and filtering for specific file types.
This post shows you how to perform an incremental load. This runs on a set schedule and only copies files that have been modified since the previous run.
1. Introduction
When migrating data from one system to another, batch approaches can be broken down into two types; full load and incremental load. A full load copies all data from the source to destination whereas an incremental load only copies data that has been modified (or created) since the last successful run. Figure 1 shows the difference between these two methods. For full load, the entire input dataset is included in the change set which is then written to the target system. In contrast, incremental load doesn’t include existing data in the change set, only a small amount of data is written to the target system which already has existing data.

In our previous posts (here and here) we have built Logic Apps that are manually triggered and perform a full load, we lift-and-shift all files in SharePoint.
In this post, we will modify our existing Logic Apps (which perform a full load) and implement a solution for incremental loading. Figure 2 shows a comparison of these approaches.

By the end of this post you will have all the tools you need to perform your own SharePoint to Azure data migrations!
2. Implementation
To focus on the differences in implementation, we are going to take the simple Logic App we built in part one of this series. I highly recommend checking out that post before continuing with this one. Note that the logic is completely transferrable and can be applied to the other Logic Apps we created in part two.
The key difference in implementation occurs in two places:
Trigger: Instead of a manual trigger, we want to set our trigger to a recurrence.
Identifying Files: Instead of pulling a list of all files in SharePoint, we need to filter files to those that have been modified within our specified time window.
Trigger
To make this Logic App run on a fixed schedule, we will remove the manual trigger and add the recurrence trigger from the Schedule connector (search ‘recurrence’). This let’s you orchestrate this Logic App by specifying the recurrence Interval and Frequency, and giving it a Start Time. Figure 3a shows that when we set the frequency to Day, we then get options to specify the hours and minutes of when it should run.
Figure 3b shows how the Recurrence trigger can be configured to run hourly. In this case, we specify the Start Time and that’s it.

When you set a Logic App to run on a schedule, even if no files are copied, you will be charged for the trigger running. This won’t be expensive but to stop the Logic App from running you can disable or delete it.
Now the Logic App is configured to run on a schedule, the next step is to edit the actions so we only copy files that have been modified (or created) since the last run.
Actions
In our original Logic App we used the Get files (properties only) to extract file metadata and filter out folders so we only copy files to Blob Storage. To identify files that have been modified within a specified time period, we will extend our Filter Query.
Fortunately for us, there is a SharePoint property that accompanies every file, storing the date and time when the file was last modified. It’s important to note that here Modified also includes files being created. We call this property (conveniently called Modified) and compare its value with a specific time which then filters files that have been modified within this window.
The filter query for this is, Modified ge ‘addDays(utcNow(), -1)’
Modified: Standard SharePoint property that stores the date and time when the file was last modified.
ge: Comparison operator meaning ‘greater than or equal to’.
addDays(utcNow(), -1): Expression that calculates a specific date and time. This must be input as a dynamic expression and not a string in Filter Query.
utcNow(): Returns the current Coordinated Universal Time datetime.
addDays(…, -1): Function takes a timestamp and adds a specified number of days to it. In this case, -1 subtracts one day from the current UTC datetime.
The new Get files (properties only) action is shown in Figure 4. We have combined this new query with the original by using the and keyword: FSObjType eq 0 and Modified ge ‘addDays(utcNow(), -1)’. Combining filter queries is a powerful method for incorporating complex logic into your Logic Apps in a simple, reliable way.

We’ve only made two changes to our Logic App but that’s it! Leaving the rest of the actions the same, we have a working Logic App which performs incremental load. The full workflow is shown in Figure 5.

Verification
We verify this Logic App works by:
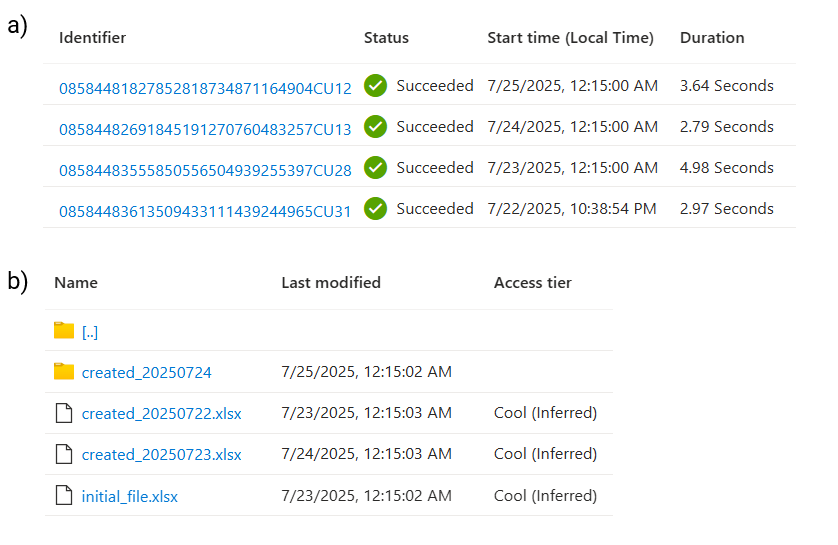
Inspecting the run history and making sure it has ran on the expected schedule. Figure 6a shows an initial run and then subsequent daily runs at 12:15 AM.
Checking that each item in Blob Storage is only updated on the day it’s modified.
For this example, I have created files in SharePoint and included their creation date in the filename. Comparing the Name values with the Last modified date in Figure 6b we see that each file has been copied in the following Logic App run as expected.
For an additional round of verification, we show an example of the hourly scheduled Logic App. The Blob container is shown at two different times, at 1:30 PM (Figure 7a) and 3:30 PM (Figure 7b). For the file, created_1305_modified_1430.xls, I created it at 1:05 PM and then added some rows of data at 2:30 PM. Figure 7a show the Last modified time aligns with the its creation and Figure 7b shows this was rewritten once it was modified at 14:30.

As in our previous examples, this Logic App retains the nested folder structure when writing to Blob Storage.
Alternative Approach
I highly recommend taking the above approach but for completeness I’ll mention an alternative method which uses a dedicated SharePoint trigger. Just like actions ,there are a large amount of triggers for each connector, SharePoint has eight as of July 2025.
You might be tempted to choose the When a file is created or modified (properties only) trigger from the SharePoint connector. This looks appealing because it’s a direct connector and leads to a very simple Logic App as shown in Figure 8. But you need to be careful when using this…

The main issue with this implementation is that the Logic App workflow is triggered EVERY time that a file is created or modified in SharePoint. If a large number of file modifications occur in a short period, then a large number of Logic App runs also occurs. If something goes wrong, it’s much harder to troubleshoot the issue than using our implementation which results in one run that copies all modified files.
You should only use this approach if you actually need near real-time data synchronization between SharePoint and Azure. If you do, then this can be used as a temporary solution but you should look at using a more appropriate data storage solution for your use case - SharePoint is not made for this.
3. Summary
In this post we built a working Logic App to incrementally load data from SharePoint Document Libraries to Azure Blob storage whilst keeping the source system’s folder structure.
In this three-part series, we have walked through how to migrate data from SharePoint to Azure by using Logic Apps. We have built workflows for both full load and incremental load step-by-step, giving you the tools to implement this yourself.
If you’re an aspiring data engineer or just looking to add a Microsoft Azure project to your portfolio then build this yourself! Drop a comment here and tag me on LinkedIn so I can celebrate with you!
This guide works as of July 2025! We will update this in the future if the implementation needs to change.
If you need Microsoft Azure support, reach out to us through our website or book a meeting with us as we offer some of the very best consulting and freelancing services.
      Thanks for reading! Feel free to follow us on LinkedIn here and here. See you next time!

          To receive new posts and support our work, become a free or paid subscriber today.
If you enjoyed this newsletter, comment below and share this post with your thoughts.